Wednesday, 20 February 2013

OUDF504: PPP Session | Building Plate Test


We had a PPP session with Annabeth and we did a quick comp test of the spaceship flying above the building. This included a lot of masking, particularly the sky as I completely swapped it from a grey overcast one to a fine blue one with a few clouds. This also meant I had to manipulate the reflections on the windows of the huge office block in order to match the sky and bring out the realism, of course not forgetting colour correction.

Below is when I was setting up the perspective cameras on Maya using an image plane of the building before it was edited. I also began to model a spaceship for the test.


Below is when I was using a simple solid to determine where the actual space ship was going to fly over. Here the building has been masked out and the sky has been changed. I also changed some colour correction to make the atmosphere of the weather match the clouds and the sky, the windows have also been masked out.


Below is when my spaceship was rendered out as an alpha channel. Rendering and exporting the animated spaceship from Maya to After Effects was the part I found challenging & I need to run through this lesson on my own. 
 

Below is the final animated spaceship composited into After Effects.


OUDF504: Filming Location Shots


My role on this cold day of filming was simply to be an extra. Everyone had their own role such as boom operator, actors, cameramen, extras etc all I was required to do was to scream and run away from nothing at the sound of 'action'. That 'nothing' I was screaming from is later to be become an alien spaceship that I will digitally composite into the scene, this spaceship will be invading earth. At this point we were all working as a group to achieve this shot but we will later part and begin working as individuals. 
The entire session lasted an entire day at uni.

As individuals, we are to digitally create 3D spaceships that will fly over the live action shots, we are to turn this into a multi shot visual effects sequence.


OUDF504: Filming Green-screen Footage


With my storyboard complete, I knew what I needed to film and what sort of equipment would be handy to me. I also made early decisions and planning by buying props. I needed a hospital surgical gown for my actor (Tim) and I also kind heartedly asked members of my class to provide me with some fake blood. Since a majority of my colleagues are cos-players, it wasn't very hard to get a handout of the fake blood from them, Lija and Luca where kind enough to both bring some on the day of the filming. As for the surgical gown, I had to make a purchase on eBay, it cost me no more that £5. 


On the day of shooting I required some major equipment such as:

  • XD cam
  • Tripod
  • x3 Red Head Lights
  • Reflector
  • Boom Mic
  • Monitor
  • x2 Green screen cloths
  • Clamps/clips to hold cloth
  • Green screen stand
  • Pop-up green screen
  • Track and Dolly
  • Crane 


Filming took me approximately 20-30 minutes, I had to make this process short as there were a few of us needing to shoot different scenes and there were also time constraints. I felt I directed the shoot well and I got enough support and help from my colleagues.

The problems I faced while filming were:
  • The size of the green screen width wise was short considering my actor was laid down horizontally, therefore his feet and his head were poking out of the green screen area. I fixed this problem by having two people stand at the back with an even wider green screen, this solved the problem.
  •  The second screen had many creases and shadows, this will become a problem when I'm compositing the footage.

Overall I was pleased with all the scenes I shot as they all matched the ones I drew on my storyboard.

Monday, 18 February 2013

OUDF504: Creating & Building the Architecture

Points & description of my models:

  • Large operating room for treatment.
  • Lots of pipes and connectors.
  • Minimalism in colour of assets and decor (mostly whites, greys & chrome).
  • Sterile environment 
  • Robotic arm planted on either ground or ceiling
  • Futuristic 
  • Sharp and edge based look
Objectives & Requirements: 
  • Breakdown Tasks
  • Split into smaller components
  • Adapt good work flow
  • Keep things simple, no complex modelling 
  • Maya level - intermediate
Creating the environment proved a bit of a challenge because I was trying to be creative with the assets but at the same time I found it hard to imagine what a futuristic spaceship may look like. Setting targets and goals for myself really helped a lot as it made my work flow go a bit quicker. Prior to modelling I did research from films and a few industry practitioners. 


The dimensions to my environment above are in inches and they measure Width:180 Height:96 Depth:300. This is very important as it is something I will need when I transfer the model over to after effects to incorporate my footage. 


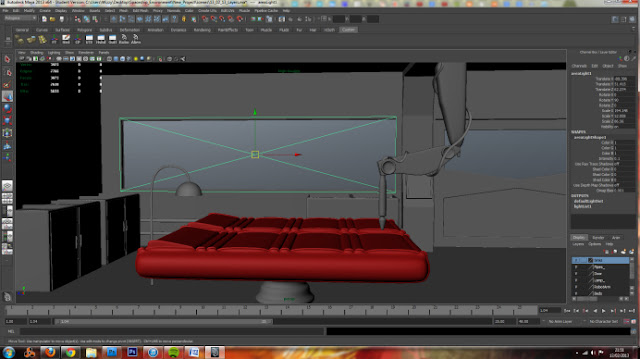
Above are the initial designs I did in the room, I began by modelling the beds, extracting the windows and the doors and finally modelling the robotic arm. I decided on attaching the arm on the ceiling instead of the floor because this gave it more movement around the patients. I reversed the normals of the cube in order to see the assets I was modelling. 


Above is the close up of the arm with a cable I created using the CV curve tool. 


Above: I added more assets such as sinks, lamp and pipes. I had an opportunity to use Nurbs and Subdivisions, opposed to Polygons that I always use.


Above is when I was adding an area light as I was experimenting on rendering using Metal Ray,I used mental ray materials on some of the objects. With Mental Ray, I can achieve such effects as glass and chrome. 

Concept Artist: Jim Martin

While researching cool concept art for my spaceship design, interior environment and alien body, I came across this talented artist named Jim Martin. I was really inspired by his photo-real concept work and I was impressed by his body of work. Jim is an established concept illustrator for film, games and animation, he has worked with big clients for film and games such as Insomniac games (environmental paintings for Resistance 2), Sony Computer Entertainment (designed concept vehicles and costumes for Warhawk) , Marvel Studios (Captain America), Universal Pictures (concept illustrator for Bioshock), Disney Animation (Lilo & Stitch, Bolt) , Dreamworks (Visual development for A.I) etc.

Looking at his designs, I got really inspired by some some of his interior concept designs. At the the point of my research  I was at the process of designing my own spaceship interior environment, therefore his designs where very helpful. The most distinct art that caught my attention was the Captain America art that he did. See illustration below.


Even though the room is very industrialised, my attention was mostly drawn to the bed with the leather strap restraints the most. My Idea is near the same only the room will be much more futuristic, therefore the décor will be much more advanced, on the illustration above, the room looks like it is set in the 50s.


The way Jim also painted the lighting in the room is something that also caught my eye. Lighting is very important when modelling a scene, in this case it looks as if it is during daytime by the look of the natural lighting coming through the windows. In my case I will be using indoor lighting as the room will be set in space.
Jim also included a lot of tubes and pipes, this is something I'm planning to incorporate on my Maya, this is something which is easily achievable using the CV Curve tool.


Above is another illustration that uses distinct lighting to give the room character.