We recently had an unexpected visit from one of the ex-College Of Art students. Him and his colleague came to show us where they are in life three years after leaving education. They now own an animation studio known as Distant Future Animation Studios located in bradford. The services they provide in their company are Character Design and Animation, Product and Medical Visualisations for companies, Motion graphics and Logo Animation, Stereophonic 3D, Motion Capture and Music Videos. They're main tool is Autodesk Maya.
What inspired me is that it is possible to work for yourself and develop yourself in a short period of time, even though it's not easy it is worth that shot. They mentioned that now a days it is very difficult for animators to find paying jobs after graduating. Being a freelance animator also doesn't pay much unless you're widely known.
They're company is now credible and profitable since they acquired office space, not only that but they've also worked for big clients such a E4, N-power, RBS and Mercedes Benz.
Here's a clip of their latest showreel :
Distant Future Animation Studio 2012 Showreel from Distant Future Animation Studio on Vimeo.
Friday, 10 February 2012
CYRIAK : Animator
Cyriak is a freelance animator based in Brighton. He's worked in a number of commercial projects, from tv advertising to channel idents and even music videos. He's widely known for his weird animations and sense of humour. He recently visited us in Uni to give us a little taster of what he does. I immediately admired his humour and his work as it inspired me to be a free-spirit. He's choice of style is very different from commercial animations you see on a daily basis, yet it fits in the same industry as the rest of them.
I do not see myself doing his type of animation but what I learnt from him is if you put in hard work and heart into your projects you're are bound to be noticed and your efforts will pay off. He showed us most of his work and also gave us advice on what to do after we graduate, he gave us some heads up on what to expect from clients. He also mentioned that in the industry, its about who you know and not what you know. I was very inspired by him & even shook his hand. Below's is one of my favourite and most recent animations by him :
He showed us the animatics to this video, the storyboards and all the planning, he mentioned that it took 6 weeks for him to animate the whole film. He used photoshop, After Effects & Illustrator.
Wednesday, 8 February 2012
Seed Animation Studios: London

Seed Animation Studios is a London based company that was founded by Neil Kidney and Morgan Powell back in 2003. Their work is very unique, inspiring and technically proficient. Their work is featured on most UK TV channels, posters, the world wide web and other forms of digital media. They create commercials, idents, brands, virals, interstitials and short films.
Most of the animation features a lot of interesting techniques such as squash and stretch as they specialise in distinctive character design, therefore a lot of their characters have exaggerated movement and cartoony anatomies.
What inspires me about they're work is the use of lighting, use of colour, compositing, sound design and texturing. I've noticed their work on TV and it's very distinct.
Here's a 2012 showreel of their work on the video below :
Seed Animation showreel 2012 from Seed Animation Studio on Vimeo.
Storyboard Animatic
Here's my story animatic I created by scanning in my storyboards, cutting the pictures onto photoshop, editing into a sequence on Final Cut Pro and added colour tone and vignette on After Effects.
I added a soundtrack that I earlier downloaded from a royalty free website. I exported the video in Apple Pro res & H264.
The animatic gave me an idea of how long the actually animation would be, it all added up to 35 seconds which should be a decent amount for rendering.
I added a soundtrack that I earlier downloaded from a royalty free website. I exported the video in Apple Pro res & H264.
The animatic gave me an idea of how long the actually animation would be, it all added up to 35 seconds which should be a decent amount for rendering.
Storyboard Changes
On our 3D Modeling module, we were asked to create story boards that will visually narrate the Little & Large project. My initial idea was to animate a car driving over humps that were shaped like steps. Animating a car driving over humps of such shape would have been a very difficult job therefore I changed my idea to a car driving over curvy humps. This was a much simpler idea as it would be much easier to animate using motion path. 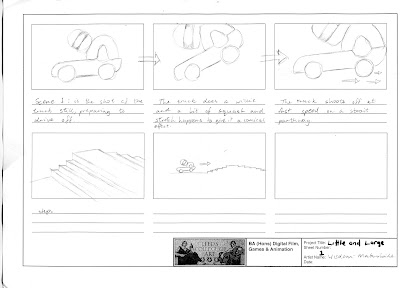

Above is the picture of the first starboard I drew.


Here the picture of the final storyboard that is going to represent the final animation. It shows the car driving over small humps, turning around and driving over larger humps. This will represent the little and large concept.
Monday, 6 February 2012
3D Modelling Progress : Environment
Here's my start to the environment of my animation. My plan is to create a road with a number of smooth humps, the second road that I will create will feature a larger version of the humps compared to the first road. This will create the little and large concept.

The image above shows the simple model with the non linear deformes. I added a number of subdivisions to help me create the smooth curves.
To achieve all this I created a Polygon Plane on the 'Polygon' menu. I then went under the 'Animation' menu, clicked on CreateDeformers > Nonlinear > Sine. Here's an illustration below :
3D Modelling Progress : Car
As my Maya skills got better through practice and research, I recorded the progress of my character as I had nearly finished it. The model of my character is a toy car which I'm planning to animate driving through a humpy road. At this stage the model is only applied with 'blinn' colour through hyper-shade, i'm yet to texture it. I had a few troubles creating the curves on the body of the car but by adding more subdivision and extruding the ends helped, finishing off by smoothing the edges by pressing '3' on the keyboard.
Here's the progress of my character so far :


Here's the progress of my character so far :


Mighty Antlers
As I was researching for animated films and practitioners, I came across this video called 'Mighty Antlers'. It's a short film directed by Sune Reinhardt who works with a company called The animation workshop. They used Auto-desk Maya to model the characters and the environment, other software used were Photoshop, After Effects, Fusion, z Brush and Adobe Premiere. What intrigues me about this animation is its noir style, it has a very distinct look to it, a twisted unexpected story and it is just an incredible piece of animation.
The vehicle movement inspired me a lot as my piece of animation that i'm producing involves an animated car. The way the vehicle takes the bends at high speed and the sound of the engine is very articulate.
The textures that the 'deer' produced, the render layers and the environment were executed very well using After effects. A lot of post production work came into play on the making of this animation, the video is below, enjoy :
Mighty Antlers from The Animation Workshop on Vimeo.
The Animation work workshop also posted a video which reveals how they made the animation, this is a 7 minute video of the making of :
making of Mighty Antlers - Sune Reinhardt from Sune Reinhardt on Vimeo.
Wednesday, 1 February 2012
Editing: Preserving A Clear Continuity
The role I brought into this project was to edit the footage. I did a bit of research into preserving a clear continuity as it is something you have to have a good eye for. I found a video montage called 'Move' by a filmmaker known as Rick Mereki. The video is a minute long and it shows Rick walking towards the camera, only he does it from various locations. He also did the editing of the film therefore he had to preserve a clear continuity as the clips are from different location but in the same angle. The video is below:
MOVE from Rick Mereki on Vimeo.
He then did more videos that envolved some skill in editing, this follwing one is about food and its called 'Eat':
EAT from Rick Mereki on Vimeo.
The final video he did called 'Learn' is different from the two above as it does not require any continuity, its almost as if the shots where chosen at random. Other interesting aspects involved in this last video are depth of field shots that were achieved by using the macro lens and the beautiful colour grading which was done in post production.
LEARN from Rick Mereki on Vimeo.
Subscribe to:
Comments (Atom)