Saturday, 29 March 2014

OUDF602: Dave Blewett | Sumo Digital

Sumo Digital is celebrating it's 10 year anniversary 
It has a staff of 200 members
It's main studio is in India
It has developed  over 30 games 
Develops games for ALL formats 
It's part of the foundation 9 union
Respected developer worldwide

Dave mentioned that the bigger the company gets the riskier it becomes of making it's employees redundant and the business going under, he was employer number 56 when he got his job, the company was planning to have a maximum of at least 60, it now has 200. The bigger the company means that the jobs have to be consistent, if a project gets cancelled , people get laid off, that's just how it works. 

Joining a union  such as Foundation 9 helps to avoid companies going under. When one company dries up with work they speak to the union and they share woe with another company that has too much work on it's plate.

So you want to be a game artist? Whats it like? How do you Impress Sumo? "It's a very hard job" - Blewett

Back in the old days there were no real specialists areas

  • No specific UI artists
  • No specific special FX artists
  • No specific Animators
  • No specific Environment artist
  • One size fitted all.


What are the different art roles today?
Now you have teams dedicated to specific roles such as:

  • Specific Concept artist
  • Environment artist
  • Character Artist
  • Animators
  • Motion Graphics (This one is fairly new)
  • User Interface Artist
  • Vehicle Artist
  • Visual Effects (Very important in today's high resolution games to have explosions, volumetric smoke, trails, heat signatures etc)
  • Technical Artist (complex rigs are used on PS4 engines and Xbox One, On PS3s and Xbox 360s & it's predecessors you had to think about the processing power. Technical artist make sure that a rig]g is not too complex and that it will be able to render in real time without slowing down the game. )
  • Lead Artist
  • Art Management
  • Art Director (Responsible for production quality)
What skills are needed to be a game artist?

  • Maya
  • Z-brush
  • 3DS Max
  • Photoshop
  • After Effects
  • Flash
  • Unity
According to Dave, to become a game artist at Sumo Digital, you have to adapt to the following

  • You have to be flexible and reasonable
  • You have to be happy to work on handheld versions of the games while the more experienced artists work on the PS4 & Xbox One version
  • You have to be adaptable in terms of picking up new skills quickly
  • You have to be realistic
  • When time and budget run out, you have to be prepared to modify your approach
  • You have to have the right team spirit
  • You have to perform well when times get hard
  • You have to be professional
  • You have to be trusted
  • Most importantly, you have to COMPROMISE!!!!


Thursday, 27 March 2014

OUDF603: R&D Presentation Feedback

These are the following issues discussed during the R&D presentation: 

The DMM simulations are very limited, the need more particles around them. This is due to the fact that I was using a demo version of DMM, the full version allows me to use unlimited Tets.

Firm the story, it is still vague. The story is vague because the main focus of the project it based around the rigid and fluid simulations. However, story is always important no matter what, this is what I will have to expand on as soon as possible.

Expand on Storyboard: this is in relation to the story.

Get an actor for the live action shots.

As soon as an actor is available, book the studio theatre for the green-screen shots, lighting is also required as well as other equipment such as tripods and boom microphone.

Talk to Mat regarding acquiring the full version of DMM

This was all useful advice and I'm taking all of it to consideration. 

Wednesday, 26 March 2014

OUDF603: 123D Scan & DMM Integration


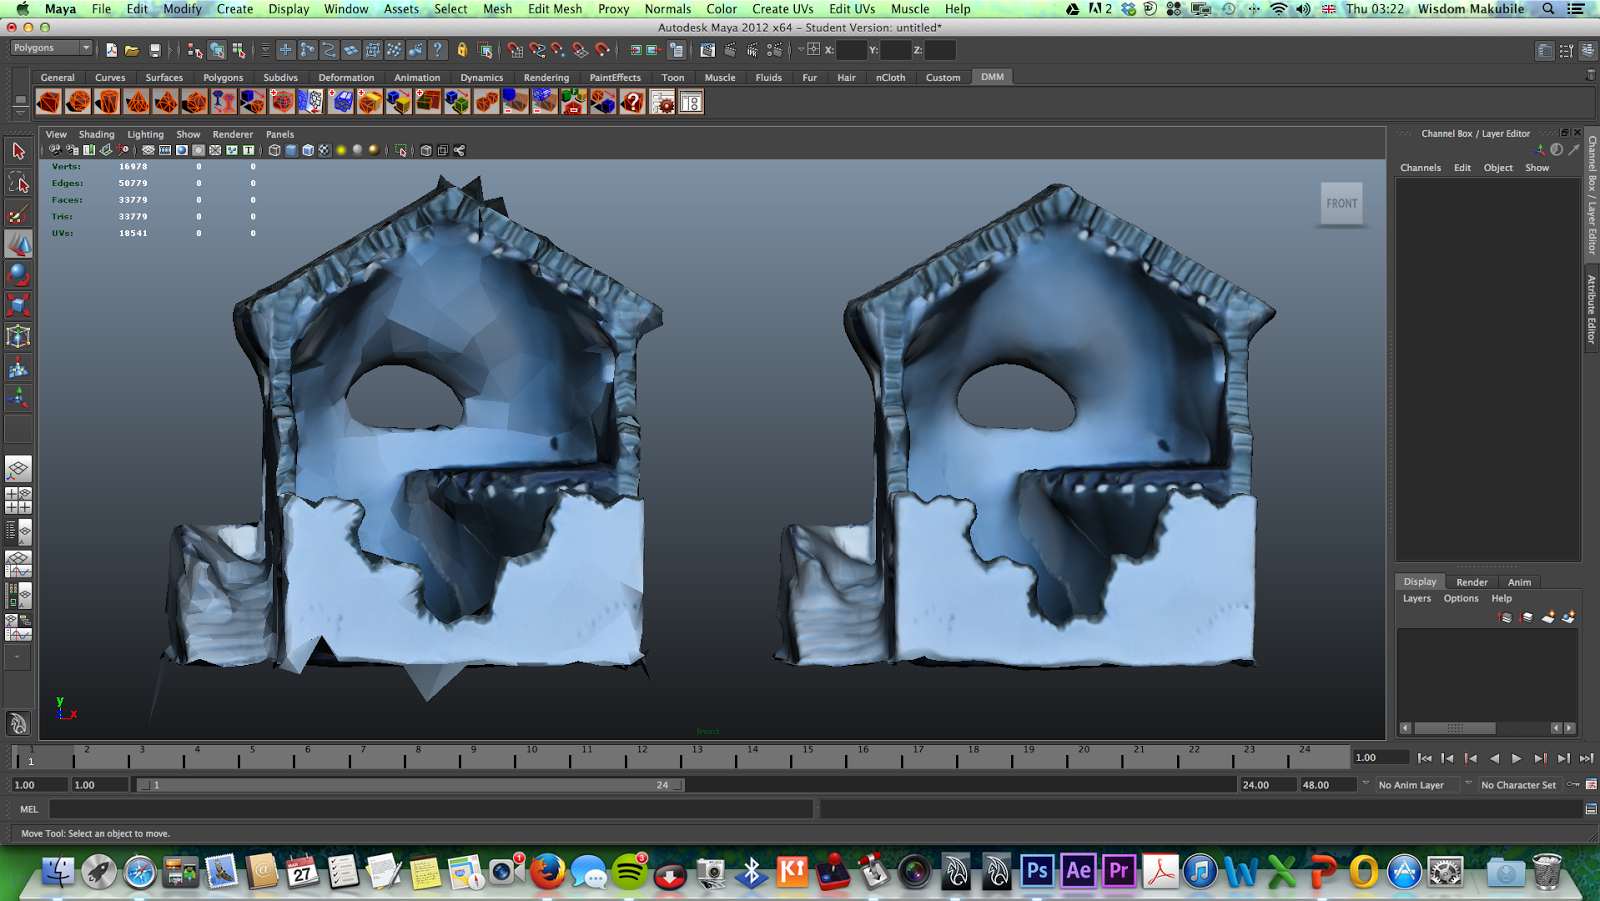
Above are two separate meshes of the scanned house, the one on the left has had the polygons reduced to only 3753 while the original on the right has 30026. The reason why I reduced the polygons was to hopefully run a DMM simulation without using too much data and processing power. 

Why it failed.

The reason why I failed to run a simulation is 'unfortunately the mesh isn't suitable for use with DMM', this is a persisting problem that I have encountered more than once now and according to my tutor, this is because the mesh has holes in it, it needs to be airtight. I've done everything to fill the holes in the mesh but the problem persists, this is something that defiantly needs a thorough investigation as it will cause problems in the future.

After reading forum regarding this problem, no one seems to have a straight answer on how to get rid of the warning even after filling the holes in the mesh. This is a problem that needs professional help and I'm prepared to question the developers about it.

Below is the warning message from the DMM plug-in:


OUDF603: Storyboard


1: Establishing shot. This is a wide angle shot of the location of where the event about to happen is established. This scene will show the viewer, mountains in the background, trees, foliage, plants, animated grass, fog and birds.

2: Medium shot of the house being teleported into the scene.

3: Waking up. This is where the main character wakes up dazed and confused, finding himself and his townhouse teleported into the middle of nowhere. The building is already half destroyed, exposing the character and the building's interior. Thinking the worst is over, to his surprise the alien craft also appears in his location. 

4: Another wide angle shot, now with the house in the location.

5: Close up of the Alien craft.

6: The Craft. This is where the craft realised the human is still alive in the building and begins to demolish the house with artillery in hopes to destroy the human. 

5: The Final Scene. The human pretends to be dead and the alien buys into it. After the alien has left the scene, the damage is catastrophic. 


OUDF603: Maya Fluids Proof of Concept

As part of my architectural destruction project, I decided it would be a good idea to learn and experiment on using the Maya dynamics to simulate fire and smoke. 

I learnt how to create fire and smoke with Maya 3D Fluids . To make my effect more powerful and realistic I first understood the science behind these complex fluids and then I separately created them in Maya. After this, I advanced to understanding the behavior of fire with smoke and then blended them in Maya. I learnt several different techniques to produce and control the behavior of fluids by creating fluids from Maya's own geometry and the particles system. I experimented with the values of the attributes to influence fluids with different fields to create believable effects. I learnt simple techniques to tackle complex effects for easy understanding and learning, this will help me when tackling the final project. The learning curve for this R&D was quite steep but I had to learn and grasp the concept very quickly through experimentation. 


There are other means of creating fire, smoke and explosions, 'Video Co-pilot' offers packages such as 'Action Essentials' in which it provides pre-comped footage, how ever these are much harder to control.

The advantage I learnt with Maya fluids is that the creative control is much higher. The important attributes that the Maya fluids provided me are such as: The base resolution which gives you the option to choose the quality of the flame, resizing the emitter, changing the temperature of the flame, the density of the flame and smoke, the velocity, reaction speed, fuel, buoyancy etc. This set an obvious advantage compared to pre-comped footage.


Experimenting with Maya fluids has given me confidence to be able to apply and develop these methods to my final project, helping the DMM architectural simulations to look very realistic and believable.

Below are my tests and experiments that I simulated with Maya fluids:


Fire Smoke Test 02 from Wisdom Makubile on Vimeo.


Door Flame R&D from Wisdom Makubile on Vimeo.

Fire Smoke Test 01 from Wisdom Makubile on Vimeo.

OUDF603: Environment Concept | Animated Set

The environment design for this project is mainly focused on the establishing shot of the scene. The aim of the final outcome is to create a 3D realistic animated parallax. As this is a wide angle shot, it is absolutely vital that it is designed accordingly and that the final composite is visually appealing. 

To prepare this idea, I had to think visually, so I began by sketching a matte painting on photoshop by painting various layers using simple shades of grey. These layers consisted of 3 layers of mountains, a layer of foreground, grass, trees, foliage and fog. Below is a value sketch of what I want the shot to look like:


Once I had the idea in mind I began location scouting, which I mentioned on the previous blog post. It was easier to search for a location with a clear idea in mind as I knew what to look for. Of course it is impossible to find an exact location I need so I took a series of images at the location. This is were the brilliance of digital compositing comes in. 

Once I came back from the location I prepared all the images I need to use and put them aside, this was in preparation for a simple 2D composite (on photoshop), of roughly how the 3D animated set would look like, this composite is the concept of the environment in richer detail. Below are the three composites, one with a pathway and the without:


The next step is to bring the images into NUKE where I'll create a 3D setup that will support realistic parallax. I'll also composite moving grass in NUKE that I'll create using the hair system in Maya 2014.

By the end of this project, I would have learnt the process of creating a digital animated matte painting and ways that I can save time by organising myself and using the software accordingly. I'll know how to use Autodesk Maya's hair system to make animated grass, how to quickly mask high resolution images in Photoshop and most importantly how to create an animated set in NUKE.

Monday, 24 March 2014

OUDF603: 123D Scan 2nd Attempt

After learning from my initial mistakes I was extremely careful how I shot this sequence of images, keeping in mind the lighting conditions and the environment. I set up resin scale model on a table and shot 20 photos at a 10° angle and another 10 photos at a 45° angle, I uploaded to the 123D Catch using the Web App (I have a Mac). I allowed the photos to process and was rewarded overnight with a completed model. 

Although it is not advised  I decided to use an external flash on my camera to get extra lighting around the model, I only had two windows in the room available, this created uneven exposure on my subject. An external flash is not advisable as it creates hash lighting even if it is diffused, but with my expertise in photography I decided to bounce the flash against the ceiling and the walls to try and get an even exposure. The key is to keep the subject evenly exposed across all photos and shoot in small sequential increments. To make sure the subject was in focus, my DSLR settings were set to shatter speed: 1/40th, aperture was fairly wide open to f/5.6 and I shot using a 24mm lens.

The colour temperature of the light was at 5400K, this was a this was a tad bit too warm, as I was shooting RAW, this was not a problem as it could be fixed in post processing, I was aiming for a cool colour temperature of at 4200K. 

As for the background  I was advised to lay the scale model on top of newspapers as this makes it easier for the application to scan and stitch the information together. I did so by covering the entire table with A3 sized pages of newspapers. 

I exported all the images from the compact flash card to the mac for editing. At the editing stage I edited the values of the colour temperature, exposure, contrast, highlights and the clarity. I uploaded the images on the web app and left it to scan and render overnight. Compared to my first attempt of a scan, I was quite pleased with the results this time. Below are images of the scans:


The scan needs a clean up, the web app has healing tools that I can use to heal the holes in my model. 

Sunday, 23 March 2014

OUDF603: Location Scouting | Golden Acre Park

Location Scouting is a largely important factor when it comes to film-making & during the pre-production and development phase  I made sure to plan out my location. Taking time to figure out a location was the first thing I did, by researching nearby forests and woods, I was able to narrow down my search. 

After narrowing down my search to three possible locations, in which they were:
  • Golden Acre Park which is located 6miles from Leeds, on the A660 Leeds Road towards Adel & Bramhope. 
  • Wharfdale Chevin Otley
  • Ilkley Moor
The location I visited was Golden Acre Park, I made sure to plan ahead and carved out as much time as I needed, considering the weather, daylight is really short. I left the house around 10am and drove to the location to make sure I had enough sunshine as possible. The length of the footage I need luckily isn't too long, it's more of a backplate of a VFX shot, so what I mostly did was shoot various angles of at least a minute each. 

When I got to the locating I found it effective to look as the location using a viewfinder, this allowed me to get an idea of whether the location was sufficient before I even started recording,
I also took number of images for later reference. I do not own a dedicated viewfinder so instead I just used my DSLR, a zoom lens and various primes (15mm, 24mm, 50mm).

Since I visited several locations while searching for a single scene, I made sure to bookmark the locations by dropping a pin on my google maps app. As this was the initial visit, this is to make sure I don't forget the locations when I'm going back to finalise my shoot and location. Taking pictures also helped as this will be a visual to show my peers and tutors during the interim presentation, this allows for better communication and critic for my project.


Below are the reference images from the location scout: 


Thursday, 20 March 2014

OUDF603: 123D Catch First Attempt.


Judging by the results, It's safe to say the first attempt of my scan wasn't a success. To my knowledge, this is due to the location in which I shot my series of images. The amount of background information given out to the software was a little too much, 123D catch didn't know what exact areas to render out, therefore giving out distorted results. 

By watching a series of tutorials from their website, I was provided with information that shooting images in an outdoor environment is a good idea as long as is good weather that provides diffused lighting. As the day was sunny and partly cloudy, I followed this information by shooting outside in a shaded area. I placed my scale model on top of a green wheelie bin, looking back at it now, that wasn't the best idea.


What I will do differently next time is, I will shoot indoors, even if the lighting isn't the best, I will shoot using the RAW setting on my DSLR. These Raw files will allow me to drastically change the colour temperature, exposure, contrast, highlights etc to suit my needs. 

Below is an art-board of some of the shots I took: 


Tuesday, 18 March 2014

OUDF603: Treatment

Working Title: The Alien Invasion (Destruction is also Creation)

Log-line: This is a story of an Alien Invading a place, while destroying everything in it's path and having disregard for human life. Although this is the log-line  the main focus of the project is for heavy use of Visual Effects in form of of CG animated simulations, fractures and particles, this will be executed as a short film. The goal is to learn, experiment, test and execute the project by using Maya's plug-in DMM, After Effects, Nuke and Premier Pro.

Primary Personal Figure: An innocent civilian in the building that is about to get destroyed by the Antagonist. 

Antagonist: The Alien Craft.

Nature of the conflict: Violent gun fire from the antagonist, with disregard to anything.

Genre Elements: Sci-fi, VFX

Key Locations: An Italian townhouse located in the Yorkshire Dales.

Act 1: Establishing shot. This is a wide angle shot of the location of where the event about to happen is established. This scene will show the viewer, mountains in the background, greenery in the Yorkshire Dales, trees and other plants, animated grass, fog and birds.


Act 2: Medium shot of the house being teleported into the scene.

Act 3: Waking up. This is where the main character wakes up dazed and confused, finding himself and his townhouse teleported into the middle of nowhere. Te building is already half destroyed, exposing the character and the building's interior. Thinking the worst is over, to his surprise the alien craft also appears in his location. 

Act 4: The Craft. This is where the craft realised the human is still alive in the building and begins to demolish the house with artillery in hopes to destroy the human. 

Act 4: The Final Scene. The human pretends to be dead and the alien buys into it. After the alien has left the scene, the damage is catastrophic. 


Monday, 17 March 2014

OUDF603: Painted Scale Model

This is the final version of the scale model, it has 2 coats of paints on which they were done 6 hours apart. The skill level of painting the house was easy, but I had to make sure I painted within the correct areas and that I had an even coat. The next process it to take a series of images (20) and scan them to 123D catch, then run a simulations to destroy the resin model further. 

Below are the images of the finished scale model.


Saturday, 15 March 2014

OUDF603: Miniature Scale Model House


As part of my development work, I decided to use a miniature scale model of a house (1:76 Scale Italian Townhouse) to allow me to closely study and replicate the scenario practically. Instead of modelling the house on Maya right away, a scale model will give me great reference and an advantage in avoiding flaws in my design. The scale is an undecorated resin model cut using a Class IV laser cutter and it requires 2 coats of Anamel and Acrylic paint.

The main problem with using a scaled down construction is that small components do not react to forces in the same way as it's full size target would, therefore instead of destroying this scale model in real world environments, it would be wiser to scan the model using a free software known as Autodesk 123D catch. 

123D catch lets you take a series of images of your scale model (usually 20) and scan them into the software, giving you a high poly mesh in which you can save and export into Maya. On Maya I will then be able to run various simulations using DMM and use them as tests for development work.

Below are some images of the undecorated resin in the process of being painted.


Thursday, 13 March 2014

OUDF603: Rigid Body Simulation Test #1

After watching an introduction to DMM I felt confident about conveying it to practise. Below is a play-blast of my first test using a CG rock I modelled and textured.


Rock Smash (DMM Simulation Test 1) from Wisdom Makubile on Vimeo.

On it's first use, I instantly ran into problems, but this may have been caused by the fact that I tried using assets from a previous project. After importing an asset of a tree house that I modelled during my unity project I was given a warning on the script editor which reads :
 
'Warning: DMM: Selected mesh(es) NOT suitable for DMM use, see Script Editor for details'


This is a problem that has not been resolved as I've researched people with similar problems, many of the forums being on the Pixelux website. It seems there is no straight forward solution to this problem as it has proven difficult to find an answer. I reached out for further help to my tutor who is an expert to the Maya Plug-in, I'm yet to receive a response. 

After doing more investigations, it seems this is a problem that happens when you import an asset that is already pre-existing. I accessed website called 'Turbo-squid', it sells pre-made assets for use with various 3D applications. After downloading a 3D model of a house, I imported it to Maya 2012 for a simulation test. Unfortunately it gave me the same persistent warning that I can't seem to deal with.

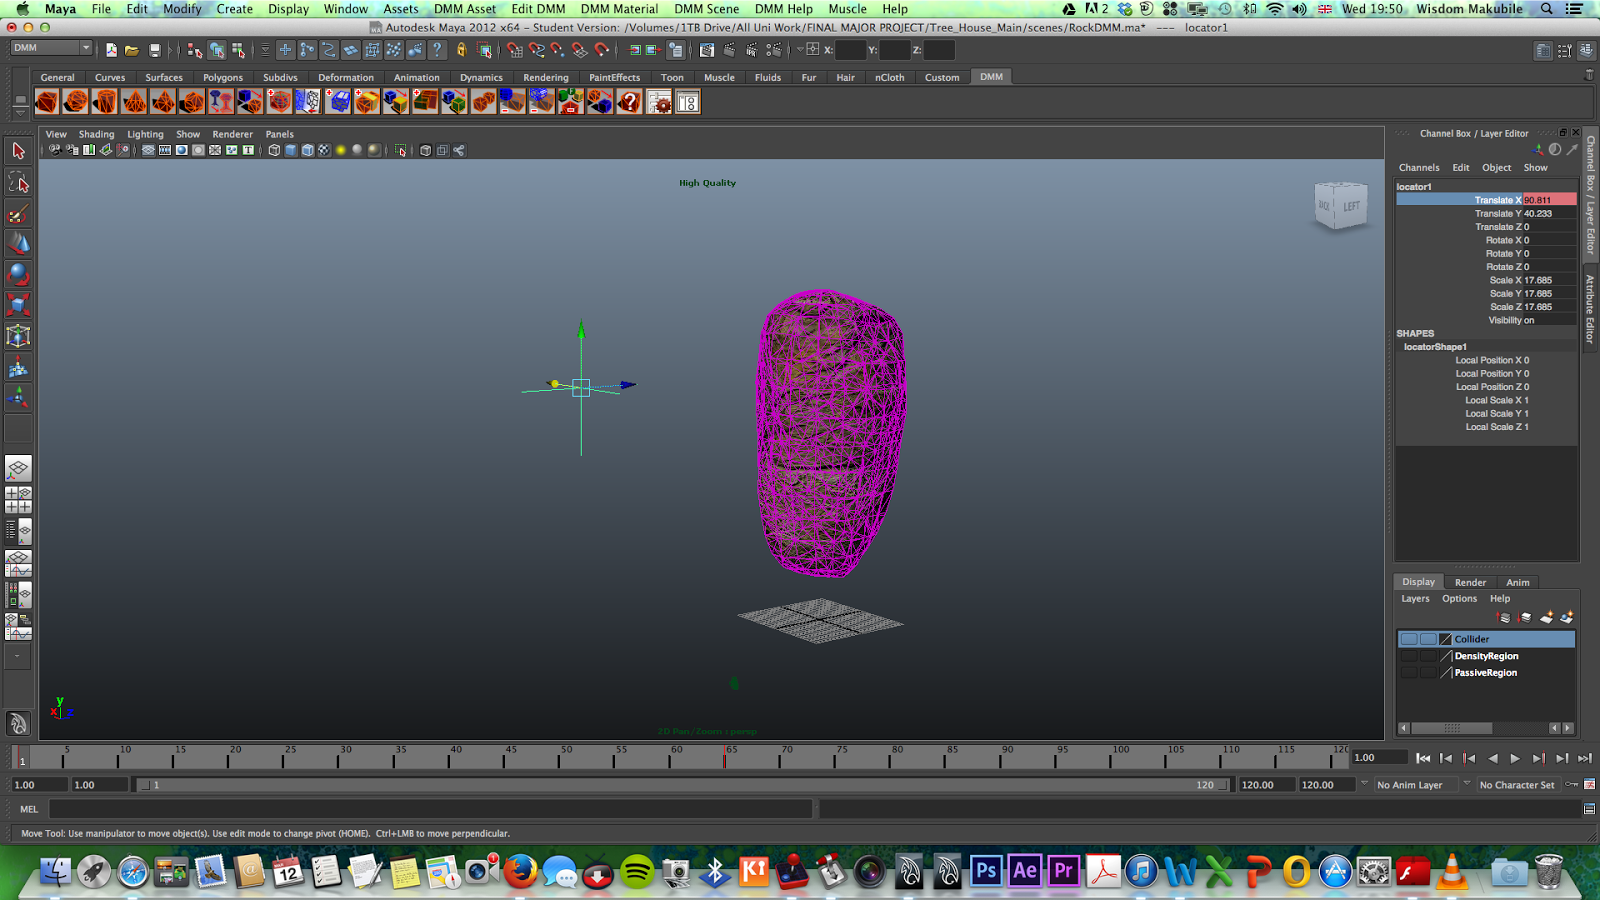
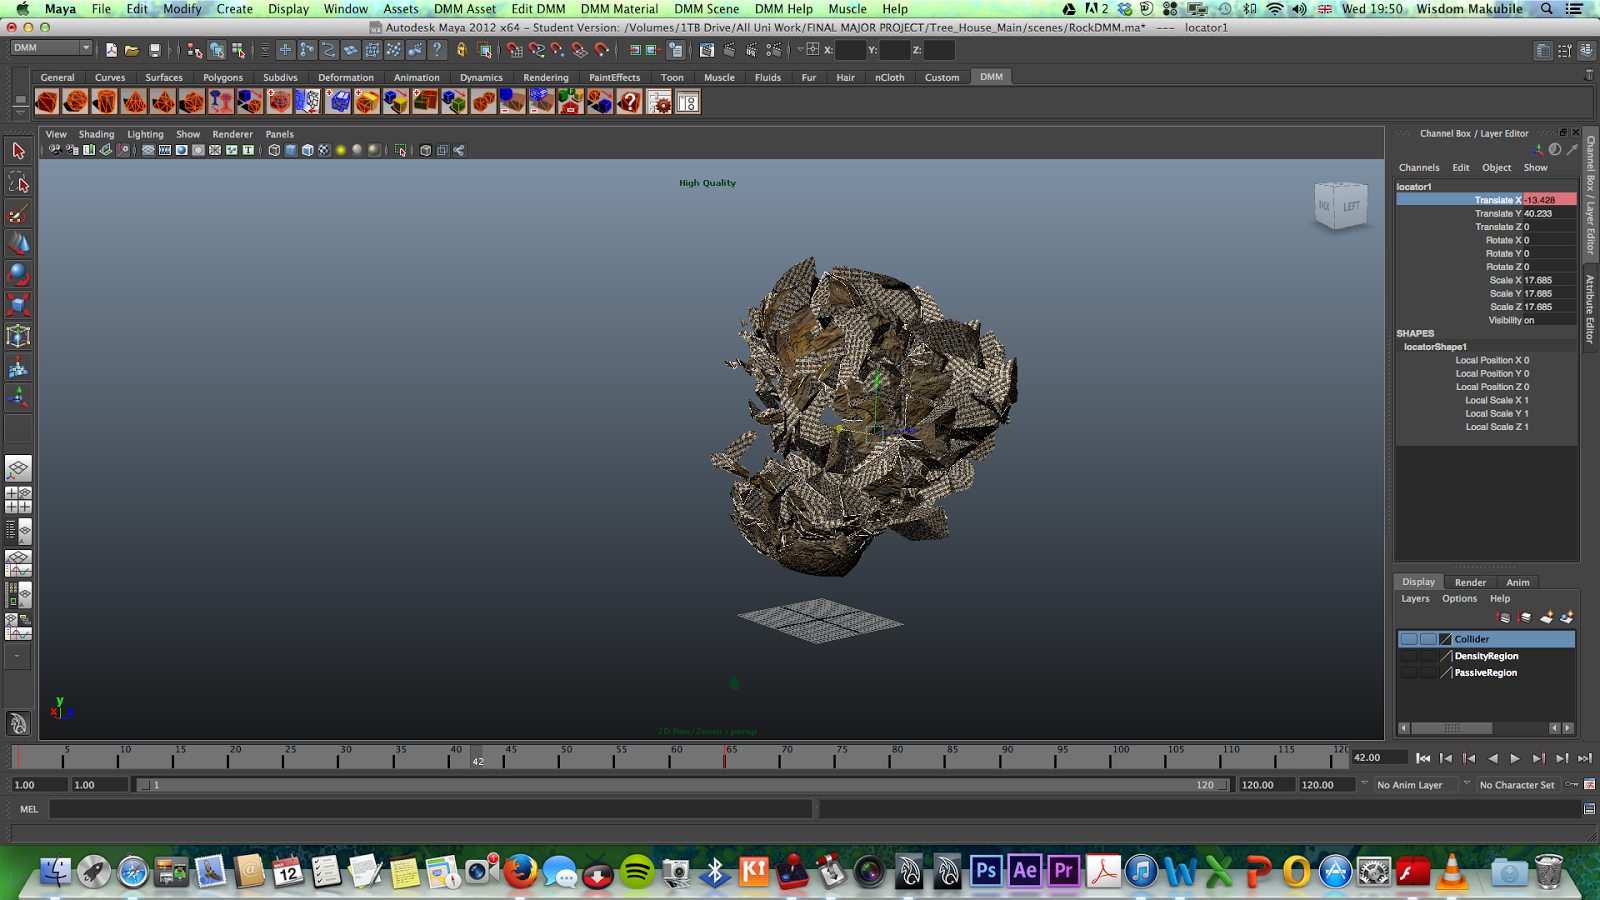
After some frustration, this led me to model a new asset from scratch as I was eager to make some progress and create my first simulation. I modelled and textured a rock, I used passive region to keep the rock in place and not fall into empty space, I then used density region in the middle of the rock to simulate smaller chunks of the rock. For a collider, I created a 'locator' and I parent constrained it to a DMM cylinder, creating an animation was simple enough, I made 120 frames and set key on the 1st frame and the 60th frame. The simulation worked perfectly and I did not face any major problems. Below are a few screen shots of my progress: 


Wednesday, 12 March 2014

OUDF603: Studying & Documenting a Building Structure.

My Interest in interior architecture has grown rapidly in recent time. Studying new materials, technologies and techniques has given myself exciting new ways to enclose digitally modelled space using, for example, architectural glass for floors and ceilings and other materials that would look appealing when designing a derelict/damaged building.

The focus of this study is to explore how interiors of buildings can be changed to meet different needs and to express different functions, for example from an 18th Century place of worship to a modern night-club.While I was researching into 18th Century French Castles, Ruined Abbeys and Churches, I came across this brilliant idea. Being an employee at Halo Leeds Night Club, formerly known as Trinity St Davids Congregational Church on Wood-house Lane, I took the opportunity to speak to the manager in charge to acquire permission to closely study and document some architectural elements of the building. This of course had to be done during 'out of office' hours, avoiding any unwanted persons in the building. Luckily being a good employee, I was granted this rare golden opportunity and to make this even better, a lighting engineer was brought in to light up the premises in order to archive ambiance and mood. 

Halo night club is an 18th Century church building, it's structure is covered with immense detail on the inside and on it's exterior. The actual age of the building is unbeknownst to me but it is speculated that it was built in the 1900s. There has been major modifications to the building to accommodate it's new purpose to safely harbour up to 2000 drunken students on a busy night. Modifications made are such as:


  • Removing the seating are to provide space for the Dance floor
  • To provide space for all the 4 bars
  • Space for the DJ booth
  • Space for the VIP area
  • Smoking Area
  • Etc
The designs that were left intact were the iconic church glass windows that depict various stories from the bible and the main exterior structure.

The reason why this building appealed to me was the fact that it would sit well in the scene of my project, although it would be hard to model a building of such scale and detail, it was a great opportunity to study it's structure closely and explore how the building is inhabited, used and experienced.

Below are the photographs I took for documentation: 

Lighting Rig attached to the wooden ceiling.

Iconic stained windows behind the bar

Spiralling staircase leading to the VIP area. Ambient lighting in the background. 

Spiralling staircase, made of metal.

Main dance floor, the floor is made of hardwood, high beam lights turned on.

Main entrance to the building, also has ambient lighting that changes colour.

The building is also surrounded by small trees


Main arches holding the structure, these are made of concrete and bricks

Concrete and brick arches 

Concrete and brick arches 

Arches and Pillars made of concrete and bricks

Sound system attached next to the arches and pillars.