On our final Crit session, days before the deadline, we were given an opportunity to go round the studio to look at each others work. We gave positive/negative feedback to our fellow peers unanimously. This is very helpful as it narrows down all your prons and cons therefore able to tackle a specific problem with given solutions quickly. During this Crit session, I only receive two types of feedback from my peers. The first is just appraisal on how they like my Robot, how the textures look good, good geometry edge flow and its realism, I couldn't help but feel goo about this, considering this time last year my confidence on Maya was very low. The second type of feedback was that the character does not match with the other one and the environment. Unfortunately this is a problem which is too late to fix, there for is it feedback I'll make sure to use in the future.
Thursday, 6 December 2012
Game Art & Machinima: Fahrenheit (Quantic Dream)
On the NTSC formats in America, this game is known as Indigo Prophecy and on the PAL formats in Europe it is known as Fahrenheit.
It is made by same games developer who made 'Heavy Rain' (Quantic Dream). Quantic Dream is an inspiring industry practitioner who develop original games, with the types of games that they use, you either love them or hate them.
On Fahrenheit there are many murders happening in New York and the player plays two sides to a story, one side is a man who's been taken over by something and is trying to figure out what is happening to him and is trying to stop this madness, the other side is the police who are investigating these strange New York murders. The game-play has an interesting control system, for example wiping blood on the floor using a mop is controlled by moving the analogue stick up and down.
This game is one of the most original titles in the PS2 systems, it uses Machinima for its cut scenes. The game's art direction is outstanding, Fahrenheit feels and looks like a movie, this is due to the way the camera angles and pans around the character. Also adding to the cinematic view is the game's use of extra screens to display actions happening in more than one place at a time, this was also incorporated in their latest instalment 'Heavy Rain'. Often when key actions are happening, your screen will split into 2 or 3 allowing the gamer to see the different events.
Below is the Gameplay
Robot & Mammoo Creative Differences
After the robot was fully modelled, it had huge creative differences with Mammoo, this was due to the way I textured it. Using realistic textures such a industrialized metal gave the robot a near photo-real look whereas Mammoo textures painted from Photoshop as a result Mammoo looked cartoony. This obviously was a problem as the robot wouldn't match the other character and the also the environment.
Figure 3 are the type of textures I used for my robot.
At the point I had realised this, it was a bit too late for me to go back into the modelling and texturing process, so I was only advised to reflect upon this on a blog-post.
This issue is probably cause by little communication between the team members.
Below are the illustrations of Mammoo and the Robot.
Figure 1 are the painted textures done by my team member Jess, they are a simple 3 shades of blue, this definitely gave the character a cartoony look to it.
 |
| figure 1 |
Figure 2 is the finished UV mapped version of Mammoo.
 |
| figure 2 |
Figure 3 are the type of textures I used for my robot.
Figure 4 is the finally Robot, as you can tell the visual differences are broad.
 |
| figure 4 |
Game Art: Robot // Arm Problem
After binding my character I encountered a problem that took me a while to solve. Both the arms where not working the way I wanted them to, every time I rotated the arms, the drills where not staying attached to the the arms. Below is an illustration of the problem.
It took me a while to figure out how to solve this, I first started by going back to a previous scene I had saved to freeze the transformation, re-constrained the skeleton and rigged it again. I then weight painted it again, I flooded the right joints with 0% influence to make it rigid. The arm then worked properly, there was no way I could have gone on without fixing this issue.
Game Art: Alien // Animation & Turnaround
Animating the Alien was nice and simple as it was low res, the mesh was weight painted properly therefore there were no weird deformations. The brief asked me to do 3 separate animations to take into unity & loop turnarounds.
Unfortunately the textures were lost when I was exporting the the FBX into unity, I had used a ramp shader as a texture but I hadn't baked the textures into Jpegs, Unity does not handle unbaked textures, that it why the Alien looks green. This is something I had not known prior to exporting, so I took it down as future reference. Below is the unity turnaround of the Alien.
Unity Web Player | WebPlayer
-->
Unfortunately the textures were lost when I was exporting the the FBX into unity, I had used a ramp shader as a texture but I hadn't baked the textures into Jpegs, Unity does not handle unbaked textures, that it why the Alien looks green. This is something I had not known prior to exporting, so I took it down as future reference. Below is the unity turnaround of the Alien.
Unity Web Player | WebPlayer
« created with Unity »
Game Art: Robot // Animation
Animating is a always a tedious task, especial for walk cycles, even professional animators say walk cycles are the hardest to do. I gave this a go and I understand where everyone is coming from. Luckily enough the animation of my robot did not require any walk cycles. This gives me an opportunity to practise in my own time instead of wasting time during the studio sessions. My animation involved the robot surveying from underwater and killing mammoo. Frames 1-60 was of the robot surveying from underneath the icy waters, frames 70-150 was of the robot swimming up to the surface, this happens while the drills are pointed upwards and spinning, this is to literally break the ice when the robot hits the surface. Frames 160-280 is of the robot stepping on the edge of the hole he just drilled, this is when he is ready to kill mammoo. Our initial team idea was to have the robot shoot a laser at mammoo using it's eye, we did not have enough time to figure out how to do that, therefore our backup plan was to have the robot stomp at mammoo.
I did a second animation in which I had use as my character turnaround. I had to incorporate Unity 3D to archive this. This task didn't take long to do but it a bit of scripting to do, luckily there was a tutorial on-line about this so I followed it. Below is the character turnaround of my robot.
Unity Web Player | Webplayer Turnaround
-->
I did a second animation in which I had use as my character turnaround. I had to incorporate Unity 3D to archive this. This task didn't take long to do but it a bit of scripting to do, luckily there was a tutorial on-line about this so I followed it. Below is the character turnaround of my robot.
Unity Web Player | Webplayer Turnaround
« created with Unity »
Wednesday, 5 December 2012
Game Art: Robot // Rigging, Binding & Weight Painting
Prior to this module we had to create an Alien character to help us get to speed to this current module. Rigging was one of the learning paths we went through. Rigging a humanoid Alien was very simple, only if you understood the techniques of a humanoid skeleton although applying the controls and constraining them can be a bit tedious My robot had way less joints compared to the Alien therefore building the skeleton and applying it's controls became straight forward.
I first drew out my skeleton (figure 1) on paper to get a clear
idea of what it would look like when its rigged. After the approval from my tutor I then began building it on Maya.
After the skeletal system was fully built, I was confident it would work, it required way less controls that the one of the Alien model, it requires the root joint, hip dislocate, arms, drill spins, knees and the legs.
I first drew out my skeleton (figure 1) on paper to get a clear
idea of what it would look like when its rigged. After the approval from my tutor I then began building it on Maya.
 |
| figure 1 |
After the skeletal system was fully built, I was confident it would work, it required way less controls that the one of the Alien model, it requires the root joint, hip dislocate, arms, drill spins, knees and the legs.
 |
| figure 2 |
I was first advised to bind my robot using the rigid bind as this was a rigid metallic robot, but I realised that the only moving parts of the robot where the arms, drills, the eye and the legs. Most of these required a smooth bind, it it impossible the use multiple binds on one skeleton, so my only choice was to use a smooth bind and then flood the rigid joints with 0% influence when weight painting. Figure is the robot fully rigged, bound and ready to be weight painted.
 |
| figure 3, bound rig |
Monday, 3 December 2012
Game Art: Robot // UV Mapping & Texturing
UV mapping was one of many skills I acquired in level 2 of my course therefore I figured I would breeze through this stage, I was wrong. Unwrapping a sphere proved harder than it was, even by using a spherical mapping (figure 1). The spherical map just scattered too many UVs to the point of not knowing how to sew it all together.
 |
| figure 1 |
 |
| figure 2 |
 |
| figure 3 |
Unwrapping the pyramid shaped drills was easier than the sphere, I used a cylindrical map to unwrap it (figure 4). For the textures, I first experimented with using the ramp shader on the hyper-shade in which I chose three colours for the drill. This made it look to much like plastic, therefore I decided on using a metal textures applying them through on photoshop. I acquired these from CG textures.com.
 |
| figure 4 |
Figure 5 the UVs were not perfect as they a few seams. I tried my best to sort these out by unfolding the UVs but a few imperfections remained, these are not very much visible to the naked eye unless inspected closely. I ended up not liking the the texture nonetheless, therefore I kept searching for a more suitable one, the sources I used where CG textures and google images.
 |
| figure 5 |
Figure 6 is the new texture I used in favour of the ramp shader, I used three layers of metal and painted blood at the point of the drill.
 |
| figure 6 |
 |
| figure 7 |
 |
| figure 8 |
Game Art: Robot // Modelling
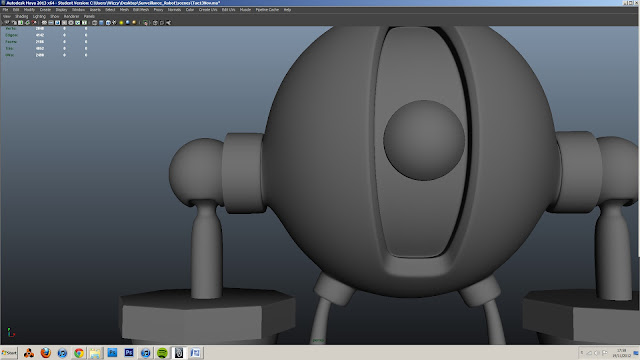
After sketching out a couple of ideas for my character, me and my team came to an agreement to my chosen idea. I decided to model a robotic character. The idea was to create a rigid character that had humanoid features but did not move like a human being. The robot has a huge rounded head that works as its body, meaning the arms and the legs pop out directly from the head. The robot has one eye. The modelling process wasn't hard at all as level 2 had prepared me for this, the only hard part was figuring out how the robot was going to work in terms of animation.
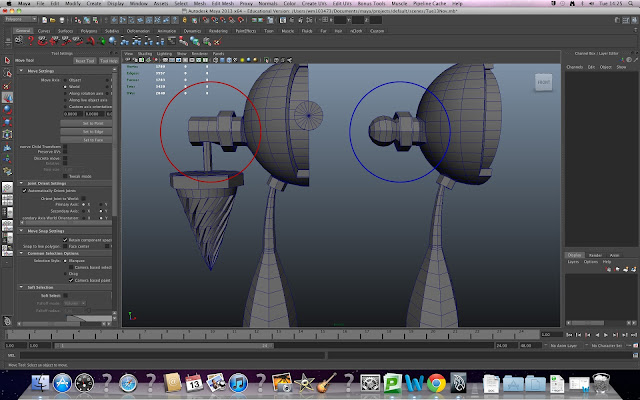
The illustration below shows the two different ideas I had for how the arms were going to rotate. On my initial idea (figure 1) (circled in red) I came to a realisation that the robot would only be able to rotate on the Y axis but not on the Z axis. Therefore I had to design another concept that would allow me to rotate the arms on the X,Y,Z axis. A ball shaped shoulder immediately came to mind (circled in blue) and this would have allowed me to rotate the arms on all axis, I went ahead with this idea.
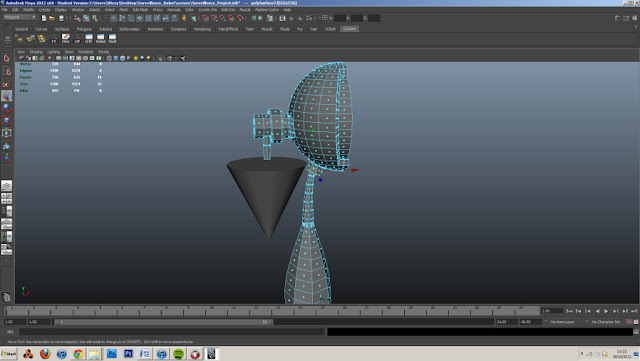
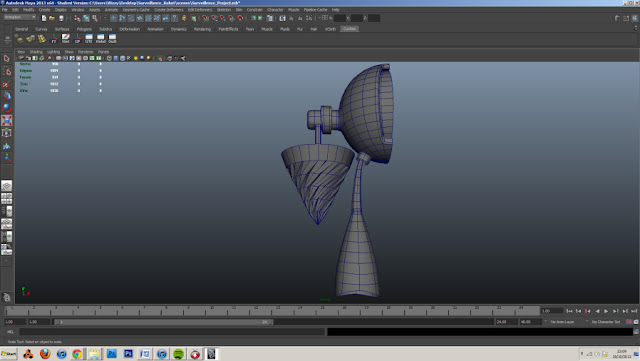
On figure 2 below I had to create the drills for the arms, this was simple to do as I only had to create a polygon pyramid, the only challenge was creating the grooves on the drill. I achieved this by extruding out alternating subdivisions and applying a non linear twist deformer, the result being figure 3 below.
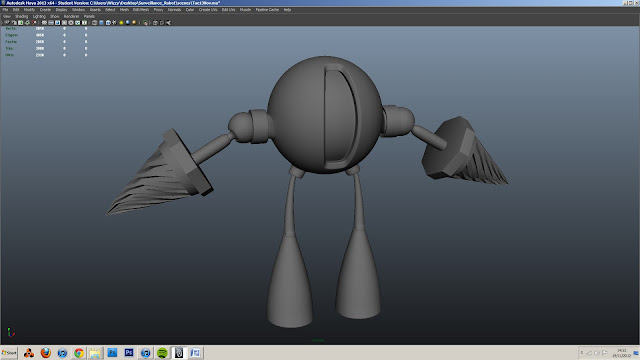
Below is the finished version of the model.
The illustration below shows the two different ideas I had for how the arms were going to rotate. On my initial idea (figure 1) (circled in red) I came to a realisation that the robot would only be able to rotate on the Y axis but not on the Z axis. Therefore I had to design another concept that would allow me to rotate the arms on the X,Y,Z axis. A ball shaped shoulder immediately came to mind (circled in blue) and this would have allowed me to rotate the arms on all axis, I went ahead with this idea.
 |
| figure 1 |
 |
| figure 2 |
 |
| figure 3 |
 |
| figure 4 |
This is the version of the robot with the eye, the next stage is texturing the model.
 |
| figure 5 |
Tuesday, 27 November 2012
Tuesday, 13 November 2012
Humanoid Robot Character Research
 |
| figure 1 |
fig 1
Above (figure 1) is my idea of the robot redrawn by my group member Jess, the Robot has similarities to Iron Giant.
 |
| figure 2 |
Figure 2 is the Iron Giant.
-I then begun re-researching to get inspiration for new ideas by looking at illustration of Humanoid androids online.
-Although my new idea was sort of straying off the 'humanoid' angle, the idea was to have a head for a body and it's arms and legs connected directly to the head. I did some research of 3D android illustrations to help me execute my plan. Below are a few Ideas and inspirations which caught my eye.
Monday, 12 November 2012
Psychoanalysis
Psychoanalysis is a theory of the mind and it is also a therapeutic process. It's a process done by one individual who's professionally trained to listen to another individual, trying to understand issues and problems they derive from the past. Psychoanalysts are experts on human development and human behaviour, they're skilled to understand what lies on the patient's subconscious.
Sigmund Freud was one of the first people who listened in this unique way, he was a neurologist by training. He treated hysteria patients using psychoanalysis and he gradually developed this process of listening to individuals and connecting the dots. He grew tired of people looking at him and he suggested his patients to lie down, therefore developing this technique of using the couch. This technique worked so well because it freed the patient and let them open up when they speak about very intimate things.
Freud also studied the stages of infancy, the stages a child goes through in order to become a fully conscious being. A child develops preconceptions that must be dealt with in order to develop successfully through the Oedipus complex, castration and penis envy. The dynamic unconscious is created through infancy to protect our conscious selves from events, ideas and thoughts.
-Psycho-sexual Identity
Oedipus complex- sexual/love feelings towards mother and resentment of father through childhood dependence and self centred world view.
-Castration complex
The boy fears castration while the girl accepts that she has already been castrated. (The phallus as a symbol of power).
-Penis Envy
The girl experiences this when she begins to realise she does not have a penis, not as a sexual organ but a way of relating to the father-figure.
-The Uncanny
The uncanny is something that is simultaneously unnatural yet familiar. Analogies between the unconscious (psychology) and the uncanny (aesthetics).
-Freudian Models.
Id, ego, super ego this means Unconscious, preconscious and conscious.
Id (unconscious) - it represents the biological/ instinctual part of ourselves.
Ego (conscious) - this one represents the individual/ personality of ourselves.
Super-Ego (social-order) - In Psychoanalysis, according to Sigmund Freud, this is the component that is developed because of the Id. It is the formation of internal standards (most importantly included are morals). The superego strives for perfection. This component is initiated by the pressures of parents, peers, and society.
After Sigmund Freud died Jacques Lacan represented his own brand of psychoanalysis in the 1960's-70's 'claiming a return to Freud'
-The Lacanian Unconscious
It is structured like a language , the language is the discourse of the super ego.
-Conclusion
Psychoanalysis provides us with the definition of the unconscious, its a tool to help us understand how art and design affects us and why. Many films of our generation have referenced psychoanalysis and Christopher Nolan's Inception being of my all time favourite.
Sunday, 11 November 2012
Game Art & Machinima: Surveillance [Draft 1]
The first draft I came up with was about surveillance, it is about two characters interacting with each other in an elevator. They are in a urban cooperate building, their mission is to explore the rooms in search of the server room. They are being surveyed through CCTV cameras and given instructions by an anonymous person heard through a tannoy, they're are given clues on where to go.
-When the characters are in the elevator idle, a female voice is heard over the tannoy:
"This is not a training exercise, you're equipped with live rounds and your mission is to locate the server room. You have exactly 60 seconds until the floor security is activated. Good-luck gentlemen."
-When the voice is done talking, the elevator doors reach the top floor and a ping sound is heard and the doors open. The characters begin to walk/run through the corridors trying to locate the right door.
Character & Environment ideas :-
- Elevator
- CCTV in elevator
- No dialogue heard as the characters speak as this will be viewed from CCTV cameras
- Simple hand gestures when the characters speak
- Long narrow corridors in a cooperate building, plain carpets, walls, neon lighting, office water coolers, plants, chart posters and doors.
This idea didn't end up being chosen by my group.
Weight Painting // Custom Attributes (Alien)
After the character was bound to the geometry, it was time to start weight painting. Weight painting took me a while to understand in terms of which parts of my geometry needed influence and vice versa. After asking relevant questions and doing a bit of researching it became understandable. Once I got the hang of it, it became an enjoyable task.
-I flooded all the influence on the end joints such as the fingers, the toes, the jaw end, the left and right brow, the left and right eye, the head end and finally the root joint. After this I begun repainting in the positive influence on the jaw end.
fig 1
Fig 1 shows weight painting of the jaw, this makes the deformation around the mouth look natural when the subject is animated to talk.
-After weight painting, I begun creating custom attributes on the controllers. These were to control the fist, peel heel, toe tap, stand tip etc. These attributes are very helpful when it comes to animating, they make the work flow much faster. This also helped me detect the joints which needed more painting. For instance every time the heel peeled, the was geometry being pulled, this gave me a clear visual of where I needed to paint.
fig 2
fig 2 shows the process of creating a custom attribute on the fist by setting driven keys. Set driven keys gives me an opportunity to load the driver (controller) and the driven (joints), by this I can set the keys at the values I want.
fig 3
Fig 3 is the peel heel attribute and it's numeric value at 10, that is the maximum the character can peel the heel from the surface.
-The process of creating these attributes takes a bit of time to get the hang of it, I'm looking forward to doing it for my Robot as it will help a great deal.
Subscribe to:
Comments (Atom)


